1. Introduction
A single SignStix device can be used to drive up to 7 shelf-edge screens (Edge by Selectronic). In effect, a set of screens assembled into a row (along a physical shelf) becomes one long signage canvas. This allows the creation of eye-catching animations that span the entire length of the shelf.
This note is aimed at installers and describes how to set up SignStix for use with Edge by Selectronic.
2. Concepts
The SignStix / Edge combination works as follows:
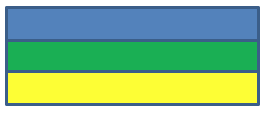
• Content is designed in SignStix Creator as a long thin sign (covering all the shelf-edge screens in the set, which is 3 in this example):
![]()
•When the sign is deployed to a SignStix device, a special setting tells the Player software to dynamically split the sign into horizontal ‘strips’ which are stacked on top of each other:

• The Selectronic shelf-edge screens are configured to display the appropriate strip of the HDMI signal produced by the SignStix device:

3. Installation
It is assumed that the Edge by Selectronic hardware has already been installed (please consult Selectronic for details). This section describes how to set up a SignStix device for use with shelf-edge screens.
3.1 You will need:
-
- A ‘normal’ screen (ideally small and portable) to use when adjusting settings and checking the HDMI output of the SignStix device.
- A spare HDMI cable for connecting the SignStix device to the normal screen.
- A USB mouse for changing settings on the SignStix device itself.
3.2 Preparation
1.Using an HDMI cable, connect the HDMI output of the SignStix device to the HDMI input of the normal screen.
2.Power-up the SignStix device and the normal screen.
3.Make sure you can see the output from the SignStix device on the screen.
a.If you see ‘No Signal’, you may need to select a different HDMI input source on the screen.
4.Plug a USB mouse into the SignStix device.
3.3 Set the Display Resolution
The HDMI output resolution of the SignStix device needs to be set to 1280 x 720 pixels as follows:
1.Navigate to the native display settings.
a. The exact steps for this vary depending on the model of SignStix device.
b. Typically it involves exiting the SignStix Player software (double-right click to escape from signage, then right-click again to exit the Player), and opening a separate Settings app (the icon for which usually looks like a cog wheel).
c. Note that there may be two different Settings apps on the device, so if you can’t find a particular setting in one app, please try the other one.
2.Within the ‘Display’ section, find the setting called ‘Resolution’, ‘HDMI Output Mode’ or similar.
3.Set this to ‘1280 x 720’ or ‘720p-60Hz’.
3.4 Remove any Black Border
The aim here is to eliminate any black border that the SignStix device may be adding round the content. On a new device, there should be no black border, but if the device has already been used in another context, a border may have been added to match a particular screen model. This will need removing as follows:
1.Navigate to the native display settings (as above).
2.Find the ‘Screen Scale’ or ‘Display Position’ option and adjust it to its maximum setting.
3.Close the Settings app.
3.5 Start the SignStix Player
Now start the SignStix Player app (if you cannot find an icon for starting the Player, re-power the device and the Player will start automatically).
3.6 Prepare and Register the SignStix Device
Follow these instructions to prepare the device and register it to your SignStix account:
http://www.signstix.com/support/tutorials/preparing-a-signage-device/
3.7 Upgrade the SignStix Player (if necessary)
1.Log into SignStix Director.
2.Locate your device in the ‘Devices’ page.
3.Check the Player version number shown in the table.
4.If it is 2.9.X or earlier, you will need to upgrade the Player to version 2.10.X or later.
a. For details on upgrading, please see: http://www.signstix.com/support/how-do-i-upgrade-my-devices-to-use-the-latest-player-software/
3.8 Set the Number of Shelf-Edge Screens
Most SignStix device settings are available remotely in SignStix Director.However, currently (version 2.10.0), the setting for the number of shelf-edge screens is only available within the Player app.Set it as follows:
1.Using the mouse, navigate to the white Controls screen in the SignStix Player
a.If the Player is displaying signage, use a double-right-click to return to the Controls page
2.On the Controls page, click the ‘Settings’ button.
3.Scroll down the resulting list of settings to the ‘CUSTOM SCREENS’ section.
4.Set the ‘Number of horizontal screen strips’ to the number of shelf-edge screens in your set (1 to 7).
5.Right-click to close the Settings.
6.Click the ‘Start Signage’ button.
No further changes will be needed on the device itself, but please leave it connected to the normal screen for the time being.
3.9 Create a Shelf-Edge Sign
This section assumes that you have some experience of creating signs in SignStix.If that is not the case, please see this tutorial first:
http://www.signstix.com/support/tutorials/creating-a-new-sign/
1.Log into SignStix Director then launch Creator.
2.Create a New Sign.
3.Set the resolution of the sign so that:
a. The width is (N x 1024) where N is the number of shelf-edge screens in your set,
b. The height is 100
4.Design your sign so that there is a block layer corresponding to each shelf-edge screen (mimicking the earlier diagram):
a. Make each block 1024 pixels wide and 100 pixels high
b. Arrange them end-to-end along the sign
c. Give each block a different colour
5. Save and publish your sign
3.10 Deploy Your Sign
This section assumes that you have some experience of deploying signs in SignStix.If that is not the case, please see this tutorial first: http://www.signstix.com/support/tutorials/deploying-a-sign/
1.Deploy the shelf-edge test sign you created earlier.
2.Wait for a minute or two and check that the normal screen updates to show your sign.
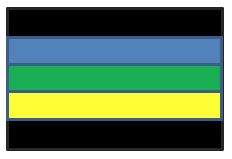
3.You should see content similar to the following:
3.11 Adjust the Display Region
All the shelf-edge screens will process the same incoming HDMI signal from the SignStix device. But they are designed to only extract and display a horizontal region of size 1024 x 100 pixels.
There are ‘dip switch’ settings on a shelf-edge screen, and these determine whether the screen will display the top-most such region, or the second-from-top region, or third-from-top etc. as appropriate for the screen’s physical placement.
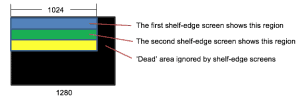
So a final adjustment is required because the SignStix device will be spreading its content over the full 1280 x 720 canvas available. The content needs manoeuvring into the top-left area of width 1024 pixels, otherwise, the shelf-edge screens will not show the correct regions.

This adjustment can be made using the video-wall settings on the device:
1.Log into SignStix Director.
2.Locate your device in the ‘Devices’ page and click the pencil icon to edit.
4.In the ‘General’ section, enable ‘Draw at top left’.
5.In the ‘Video Wall’ section, enable ‘Video Wall’.
6.Set the Panel Width to 1280
7.Set the Panel Height to 720
8.Set the Wall Width to 1024
9.Set the Wall Height to 700
In effect, this is telling the device to spread the content across a ‘wall’ of the correct resolution, but we define our ‘panel’ to be bigger than the wall, to get the black ‘dead’ area on the right, as required.
3.12 Test with the Shelf Edge Screens
Now the SignStix device is fully ready for use with the shelf-edge screens.
1.Disconnect the HDMI cable from the SignStix device.
2.Connect the HDMI output of the SignStix device to the first HDMI input on the shelf-edge assembly.
3.Power-on the shelf-edge assembly.
4.You should see content on the shelf-edge screens similar to this:

4. Notes
Please note the following:
- Video is not yet supported.It will play but it will not appear in the expected position.
- Shelf-edge screens are supported from Player 2.10.X onwards.