1. Introduction
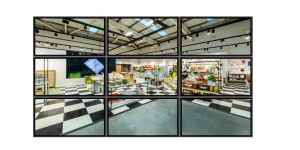
A video-wall is a combination of two or more screens or ‘panels’ which have been mounted in a rectangular arrangement. They operate together as one large canvas for displaying digital signage and video content. The figure below shows a 3×3 video-wall built from 9 panels.
Setting-up a SignStix video-wall is relatively straightforward, providing some basic preparations are made. In brief, the set-up process involves:
- Preparation – this includes deciding which synchronisation method to use.
- Installation – of the panels and the SignStix devices.
- Configuration – of the SignStix devices so that they act together as a wall rather than independently.
This tutorial covers a number of video-wall concepts before describing in detail the steps required to get your SignStix video-wall running successfully. Please note:
- It is assumed that you are already familiar with setting-up a SignStix device for a single panel. If that’s not the case, please see http://www.signstix.com/getting-started-with-signstix/.
- Installation of the panels is not covered. Please consult your panel supplier for guidance.
2. Video-Wall Concepts
To understand how a SignStix video-wall works, please read the following sections before attempting installation.
2.1 One SignStix Device Per Panel
In a SignStix video-wall, each panel is driven by its own SignStix device. All the devices in the same video-wall are configured to be in the same ‘site’ and ‘zone’. So when a sign is deployed to that zone, all the devices in the wall display the same sign.
However, on its own, this results in repeated content across each panel, as in the figure below.
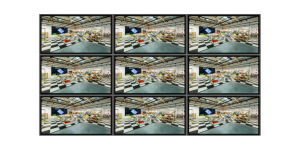 For some situations, repeating the content in this way can be effective, but the aim here is to have one copy of the content spread across the entire wall.
To achieve this, each device is configured so that it knows which physical region of the video-wall it represents and can therefore ‘zoom in’ on the corresponding part of the content, as in the first figure above.
2.2 Wall Resolution
The ‘resolution’ of a video-wall is its total width and height in terms of pixels. The greater the resolution, the more detail a wall can display, and the more impressive it will look.
For example, suppose the resolution of a single panel is 1920 x 1080. This is a common resolution often known as ‘Full HD’ (High Definition) or ‘1080p’. The resolution of a 2×2 video-wall built from those panels will be double that i.e. 3840 x 2160. This resolution is known as ‘4K’ (because there are roughly 4,000 pixels along the longest side).
However, the effective resolution of the wall depends on the weakest link in the processing chain, not just the total number of screen pixels. The following can all have an effect:
- The resolution of the source content (video or signage).
- The maximum video resolution that a signage device can decode (which is 4K on current SignStix devices).
- The output resolution of a signage device (this can be Full HD or 4K).
- The maximum resolution that a single panel can display.
- The number of panels in the wall.
For example, if the resolution of a source video is 1920 x 1080, the effective resolution of the wall cannot exceed this because there isn’t enough information in the video. In practice, the content will be ‘upscaled’ so that each pixel from the source video is stretched across 4 neighbouring pixels in the video-wall, as shown below.
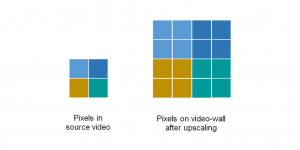
The overall result can still be impressive in terms of physical size, but it will not utilise the full capability of the wall. To a viewer standing close to the video-wall, it may appear slightly pixelated.
So for best results, the resolution of the source content should match the resolution of the video-wall
2.3 Video-Slicing
Even though the maximum resolution supported by a SignStix device is currently 4K, it is still possible to build a 4×4 wall, say, and achieve 8K resolution (assuming you have an 8K source video to play on it).
This is because the SignStix server uses a technique called ‘video-slicing’ to chop a high-resolution source video into smaller ‘slices’. For example, an 8K source video might be chopped into sixteen 1920 x 1080 video slices, one for each device. (In the diagram below, this resolution is referred to as ‘2K’ to show its relationship with 8K.)
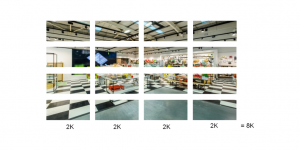
In this example, each device will download and play its own 1920 x 1080 slice (which is well within its capabilities) instead of having to process the entire 8K source video. This also helps reduce the network bandwidth required by the video-wall.
Video-slicing works invisibly behind-the-scenes by applying video processing at the time of deploying. Note that because video processing is a complex operation, it may take some time for all the video slices to be prepared and then downloaded and displayed on the wall.
2.4 Bezel Compensation
The diagram below shows a 2×2 video-wall. The ‘bezel’ is the physical frame around the flat display area. Within the display area there is usually a black ‘dead border’ just inside the bezel. The ‘active area’ is the region of pixels that can actually display a picture.
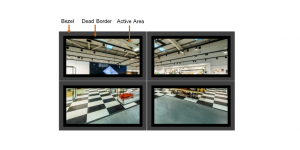 (Note that the bezels and the dead border have been drawn artificially wide here to illustrate the concept.)
Ideally, the bezels and the dead border would have zero width so that the panels could join seamlessly. However, in practice, there may be a few centimetres separating the active areas of neighbouring panels.
If each panel simply displays its corresponding quarter of the content, the bezels will cause some undesirable visual effects. For example, a moving object approaching a central bezel will appear to stretch and accelerate as it suddenly jumps across the bezel onto the neighbouring panel.
Alignment issues will also be apparent when a bezel divides an object in two, as shown below. Notice how the chess-board floor running at an angle does not appear aligned from one panel to the next.
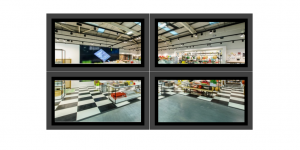
To avoid these problems, ‘bezel compensation’ is applied. This means discarding a small amount of graphical information (in this case, the content under the cross-shape formed by the central bezels). Moving objects will then appear to move smoothly ‘under’ the bezel from one panel to another.
With SignStix video-walls, the device configuration process handles bezel compensation automatically.
2.5 Bezel-Adjusted Resolution
A knock-on effect of bezel compensation is that it changes the resolution of the wall slightly. For example, consider a 2×2 wall built from four panels which have a resolution of 1920 x 1080. The visible resolution of the wall will be 3840 x 2160, as discussed earlier.
However, with bezel-compensation we’re effectively imagining that the bezels also contain pixels. So to find the bezel-adjusted resolution, we need to add on the number of ‘imaginary pixels’ in the internal bezels. This number can be calculated from some simple measurements, as in the figure below.
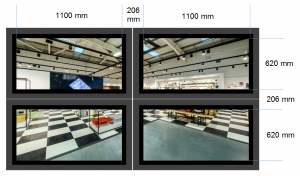
We know that the resolution of a single panel is 1920 x 1080 pixels. From the measurements above, we also know that 1920 pixels is equivalent to 1100 mm. Therefore, the number of imaginary pixels in the bezel area must be (1920 x 206) / 1100 = 360 pixels, as shown below.
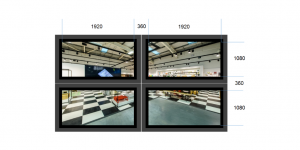
This gives a bezel-adjusted resolution as follows:
- Wall width in pixels = 1920 + 360 + 1920 = 4200
- Wall height in pixels = 1080 + 360 + 1080 = 2520
- Bezel-adjusted resolution = 4200 x 2520
So for this example wall, signs should be created at a resolution of 4200 x 2520 to fit the wall perfectly.
What would happen if a sign is created at the visible resolution of 3840 x 2160?
SignStix devices apply scaling as necessary to make the sign occupy the largest area possible. However, although the sign would occupy the full width of the wall, it would not occupy the full height.
This is because the ratio of width to height (the ‘aspect ratio’) of the two resolutions differs. The aspect ratio of the visible resolution is:
3840 / 2160 = 16 / 9
This is the familiar 16:9 ratio used in widescreen TVs. However, the aspect ratio of the bezel-adjusted resolution is:
4200 / 2520 = 16 / 9.6
This is a slightly ‘taller’ ratio, so a 16:9 sign will not quite fit a 16:9.6 wall. Black strips would be displayed along the top and bottom of the sign to make up the extra height available.
In conclusion, signs should be created at the bezel-adjusted resolution of the wall for the best fit. A formula for calculating this for any wall is provided later in this tutorial.
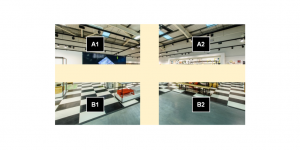
2.6 Panel Identification
When dealing with a video-wall it’s important to identify which panel is which, especially when it comes to configuration. For example, the top-left panel needs to display the top-left content not the bottom-right content! The SignStix convention for this is as follows:
-
- Label the panel rows A, B, C and so on.
- Label the columns 1, 2, 3 and so on.
- Labelling starts from the top-left, as shown in the diagram below.
2.7 Device Synchronisation
For smooth video-wall operation, it’s obviously vital that all the devices play ‘in sync’. SignStix offers two methods to achieve this synchronisation:
-
-
- Master/Slave
- NTP (Network Time Protocol)
-
We recommend using the Master/Slave method over Ethernet (usually with all the devices directly connected to the same network switch).
With the Master/Slave method, exactly one device (usually A1 at the top left) is nominated as the ‘Master’ and all the other devices in the wall are ‘Slaves’. The Master sends out regular timing messages, allowing the Slaves to synchronise their internal clocks with the Master.
Using Ethernet minimises the delay for these timing messages and ensures the tightest synchronisation. Note that the network must support delivery of the following messages:
-
-
- Multicast UDP messages on IP group 239.18.18.18, port 1234
-
Using Master/Slave over Wi-Fi is possible but not recommended due to the extra lag of wireless communication.
Alternatively, you can use the NTP method where all the devices synchronise against a separate time server. This can be a time server internal to your company, or an external one (see www.pool.ntp.org for more details). The NTP method can be used over Ethernet or Wi-Fi.
The degree of synchronisation achievable with NTP is not as good as with Master/Slave over Ethernet, but it may be quite acceptable for some kinds of content e.g. signs without a great deal of movement.
2.8 Coordinated Content-Switching
Particularly with large content such as videos, the times at which the devices in a wall finish downloading newly-deployed content may be spread over a period. So if each device starts playing new content as soon as it arrives, the wall will enter a transition period where some panels are showing the old content while others are showing new content. In general, this is not a desirable situation as the wall may look ‘broken’.
So with the Master/Slave synchronisation method (where the devices are regularly communicating with each other), the master device will try to coordinate the switchover to the new content. It will detect when all the devices are ready, and then issue a signal to switch. This causes the entire wall to switch to the new content at the same time (within a second or two).
If the ‘Download Progress Bar’ setting is enabled (in ‘Device Admin’ in SignStix Director), a slave device which has received its new content but is still waiting (for the master to give the signal) will show a small blue dot at the bottom-left of the screen.
The diagnostics for the master device can also indicate this state. There will be messages of the form ‘New manifest waiting for <N>’, where N is an identifying number of the slave device that the master is waiting for.
2.9 Portrait Walls
As well as the usual ‘landscape’ walls, SignStix can also support ‘portrait’ walls where each screen is mounted in a portrait orientation. However, there are some limitations. Please see the ‘How-To‘ on portrait screens for more information.
3. Preparation
At the planning stage for a video-wall, your preparations should include the following:
Decide on the video-wall specifications including:
-
-
- Position
- Panel model (consider resolution, brightness, bezel width, reflectiveness
- Number of rows and columns of panel
- Panel mounting
- Power cabling
- Network cabling
-
Decide where you will position the SignStix devices. See http://www.signstix.com/preparing-a-signage-device/ for requirements regarding air-flow and heat.
Decide which device synchronisation method you will use:
-
-
- If using Master/Slave over Ethernet, ensure the network supports the timing messages described earlier.
- If using NTP, decide which time server you will use and ensure it will not be blocked by your firewall.
-
4. Configuring the Video-Wall
At this stage it is assumed that:
-
-
- The SignStix devices have been installed and powered up.
- The SignStix devices have been connected to your network and to their corresponding panels (which are also switched on).
- The devices have been registered to your SignStix account.
- The devices are now displaying a default sign on the panels.
- The SignStix devices have been installed and powered up.
-
If any of the above are not true, please see the guidance on setting up individual devices at http://www.signstix.com/getting-started-with-signstix/.
4.1 Set the Location
All devices in the wall should be set to the same location. When in master/slave mode, this allows the devices to know that they belong to the same wall and should listen to each other’s synchronisation messages. Having the devices in the same location also makes it easier to assign content to the video wall i.e. assign it to the location and all the devices will adopt that content.
Once all the devices are in the same location, assign a test sign to the location, click ‘Deploy, and check that (after a short delay up to 1 minute), all the panels are showing the test sign.
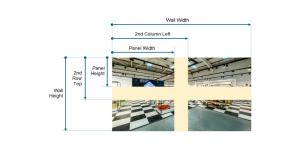
4.2 Set the Wall Geometry
The next step is to tell each SignStix device which part of the wall it represents. For a 2×2 video-wall you will need to make just six physical measurements, as shown in the figure below.
-
-
- Always measure to the edge of an active area, not the edge of a panel.
- Start measuring from the top-left of the active area within the top-left panel.
-
It is recommended that all measurements are taken in millimetres.
The figure below shows some example measurements (with a super-imposed grid starting at the top-left).
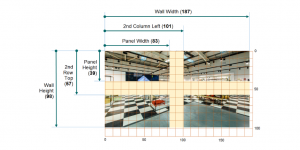
After you have made your measurements:
-
-
- Navigate to ‘Devices’ in SignStix Director.
- For each device in the video-wall, click the pencil icon to open the settings for that device.
- In the ‘Video Wall’ section, set the ‘Panel Width’, ‘Panel Height’, ‘Wall Width’ and ‘Wall Height’ to the measurements you made above. They will be the same for each device.
-
The only settings that vary per-device are the ‘Panel Left’ and ‘Panel Top’. These determine where the top-left point of each panel is within the wall. Set them as follows, replacing the terms in square brackets with your actual measurements above.
Device A1 (top-left)
Panel Left: 0
Panel Top: 0
Device A2 (top-right)
Panel Left: [2nd Column Left]
Panel Top: 0
Device B1 (bottom-left)
Panel Left: 0
Panel Top: [2nd Row Top]
Device B2 (bottom-right)
Panel Left: [2nd Column Left]
Panel Top: [2nd Row Top]
For larger walls you will need to make one further ‘Top’ measurement for each additional row and one further ‘Left’ measurement for each additional column.
Having set the geometry for all the devices, check that the deployed sign now extends over all the panels, and that objects which extend over multiple panels appear properly aligned.
Don’t be alarmed if narrow black strips are displayed at the top and bottom of the wall. This may just reflect an aspect ratio difference between the deployed sign and the wall, as described earlier.
4.3 Set the Synchronisation Method
At this stage, each panel should be showing the correct part of a sign. However, if the sign includes animation, it may be apparent that the panels are ‘out-of-sync’ i.e. movement in one panel does not match up with movement in another. This is because the devices need their synchronisation method configuring, as follows:
-
-
- Navigate to ‘Devices’ in SignStix Director.
- For each device in the video-wall, click the pencil icon to edit the settings for that device.
- Set your chosen ‘Synchronisation Method’.
a. If you’re using Master/Slave, set this to ‘Net Master’ for the top-left device (A1) only, and set it to ‘Net Slave’ for all the others in the wall.
b. If you’re using NTP, set this to ‘NTP’ for all the devices in the wall, and also set the ‘NTP Server’ to be the IP address or name of your time server.
-
Once all the devices have had their synchronisation method set, deploy a sign with some animation and ensure that (after a minute or two) all the panels appear to be ‘in-sync’.
4.4 Set the Signage Canvas Size
To make the best use of your video-wall, you should design content at the same resolution as the wall. Calculate the bezel-adjusted wall resolution as follows, where C, D, E and F are measurements you have already made:
C = Wall Width in mm
D = Wall Height in mm
E = Panel Width in mm (of active area)
F = Panel Height in mm (of active area)
P = Panel Width in pixels e.g. 1920
Q = Panel Height in pixels e.g. 1080
S = Wall Width in pixels = (P x C) / E
T = Wall Height in pixels = (Q x D) / F
Wall Resolution in pixels = S x T
You should now add this resolution as a SignStix ‘preset’ so that you can easily create signs with the correct dimensions:
1. Launch SignStix Creator
2. Choose ‘New Sign’
3. In the ‘Preset’ menu choose ‘New Custom Preset’
4. Enter your S and T values in the ‘Width’ and ‘Height’ fields.
5. Click ‘Save Preset As’ and enter a convenient name e.g. ‘2×2 Video Wall’
6. Your preset will now be available in the ‘Preset’ menu next time you create a sign
5. Final Checks
Your SignStix video-wall is now fully configured! You should be able to deploy content to the wall and see:
-
-
- The content spread correctly over the full extent of the wall.
- All the devices/panels playing in-sync.
-
If this is not the case, please see My video-wall isn’t working properly.